American Master Printmaker: Jim Pollock

PollockRBBcompressed

At the beginning of the year I moved my studio to a much bigger space.  More room for everything, more light, more horizontal space, a ventilation system (of sorts) and did I mention more space.

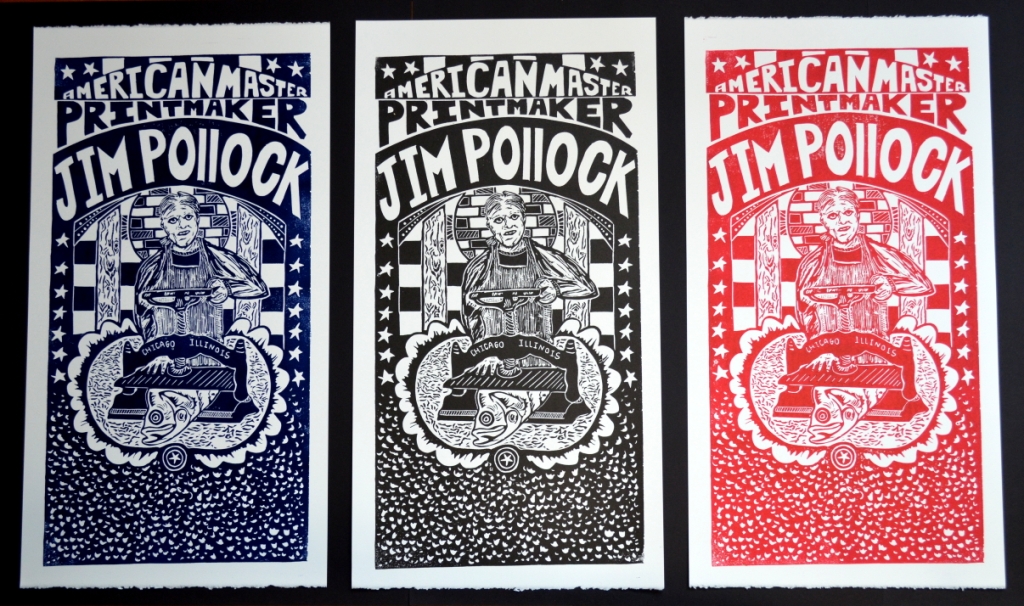
The first thing I did in the new space was to print the last project that had been designed in my old space.  It went well.  I had more than enough space to print and  dry the 120 piece project with plenty of room to spare. While printing I began thinking of what was next.  Turns out what was next was a project that had been on my mind for about a year.  I wanted to create a print to honor my favorite block printer on the planet, Jim Pollock.  Jim single-handedly revitalized the music gig poster industry.  The industry in its’ current state literally erupted around him.  He brought the art back to gig posters, which for too long were merely poorly designed graphic art, a far cry from the high poster art that we saw in the 1960’s.  His now iconic hand printed posters created for Phish are some of the most coveted posters of all time. And he did all of this while remaining a nice guy.

At one point I changed from poster collector to poster maker and I attribute all of that to Jim Pollock.  His work made me curious about block printing and some of the first things I attempted to print were his old Phish posters.  Printmaking has unlocked an unknown joy in my life and for that I will always be grateful. I could go on and on but I think you get the point.   Check out the slideshow below to see how this print came together.

This slideshow requires JavaScript.


These prints are available for purchase at my webstore:  http://marcguertincreative.bigcartel.com/

and the long road…

DSC_5457

My last post focused on what you could do in a short amount of time.  This post is the opposite of that.  For the past two weeks I labored over this poster for Phish’s Halloween Run in Las Vegas.  Comprised of 5 separate blocks, seven colors, two of which glow in the dark, The Bride of Fishman was a marathon, not a quick sprint.  Aside from the cutting time, I printed 50 of these in 2 batches of 25.  Each batch of 25 took approximately 12 hours of continuous printing to complete.  Enjoy the slide show of my progress from sketch to completed project.  This print is available for purchase in my web store: http://marcguertincreative.bigcartel.com/product/phish-halloween-2014-las-vegas-the-bride-of-fishman


This slideshow requires JavaScript.

A lot can happen in 16 hours

This slideshow requires JavaScript.

Over the weekend, my wife and son went to Upstate New York to visit her sister.  I was left alone to my own devices.  I spent most of my time in the printmaking studio.  I had one print job that had to be done…paying client.  When I finished with the paying gig I had another print in me.  So on Saturday morning around 11am, I started drawing.  I was able to create, sketch, cut and print three blocks worth of color onto a pretty nice Phish Fall Tour Poster, all before 3am on Sunday.  Print measures 9 x 22, printed on Polar White 90lb Stonehenge, with a double deckle edge. Edition Size 50. Prints will be available my webstore: http://marcguertincreative.bigcartel.com/product/phish-fall-tour-2014-phuego

IMG_4566

Transferring An Image Onto A Block

IMG_4487
Hawaiian Quilt Print. 1/1. Image Size: 15 x 15 (18 x 18 framed). Printed on Hand Made (by marc) Paper. Constructed of nearly 100% Recycle Materials. The paper was formerly legal documents. The frame was formerly peices of my house, The deacon Evelyn Blakeslee House, c1773. The only new materials used were 8 nails and the ink.

Transferring an image onto a block is not as complicated as it might sound.  There are many ways to accomplish this.  You can draw directly on the block, you can project the image onto the block,  or you can simply trace your image onto the block.  For this project I photocopied a quilted pillow case my wife picked up in Kauai this past winter.  Many people use carbon paper to transfer the image to the block.  No carbon paper, no problem:  covering the back of the image you want to trace with pencil will also make it fairly easy to transfer the image.  Tape the image and carbon paper (if you are using it) to the block and use a pencil or fine point pen and trace over the image, applying a fair amount of pressure.  Remove the image and the carbon paper if used.  Cut. Print.

This slideshow requires JavaScript.

Anatomy of a Linoleum Block Printed Poster

Recently, I was approached with an interesting project.  A fan of the best touring band in the world, Phish, was getting ready to head out on the road for their fall tour.  He wanted me to make a poster for him to give away to friends he stays with and people he meets along the way.  What a cool idea, I thought.  I spent the better part of a week drawing, carving and printing this poster.  I decided to photograph my progress along the way, enjoy the photo gallery.

This slideshow requires JavaScript.

.

Time to clean.

IMG_4335 The good thing about being a block printer is that you are in control of the entire printmaking process from design through execution of the image.  The bad thing about being a block printer is that you are in control of the entire process, which includes cleaning and other minute and time consuming processes.  My creative process is messy.  Paper covers the floor and so do pencils.  Once I have a designed nailed down it’s time to clean.  Today is that day.  I cannot move onto the next step without cleaning the studio up.  I need a semi organized space to cut the blocks..at which point I will clean again…linoleum scraps will cover the workspace.  Then I can finally print, which has the most involved cleanup of all.  So today I clean.